

How To Add A Track To Audacity
An Audacity projection can contain multiple audio tracks. Each track is normally in i unbroken section, something like a single movie clip. However, Brazenness tin split a track so as to create multiple clips within that track.
Each clip in a rail can then be moved around independently, but they all share several properties of the parent track such every bit its overall book, panning, sample rate and sample format .
Contents
- Channels, Tracks and Clips
- Trimming a prune
- Splitting a track into Clips
- Merging or joining Clips
- Moving Clips
- Moving a Clip Between Tracks
- Rail colors
- Moving colored Clips
Channels, Tracks and Clips
The terms channel, track and prune tin be a little confusing, especially because some applications may use them to mean slightly different things. Within Audacity, the significant is equally follows:
- A channel is for audio recording (input) or playback (output). Audacity tin can record two channels of input (stereo), and more than if you have a special sound card or audio device that supports more than ii simultaneous channels. Audacity supports only two channels of playback (output), no matter what kind of sound hardware you have.
- An audio track is similar i musical instrument in your symphony, or 1 voice in your podcast. Y'all tin add together more tracks, and all of them volition be mixed together to create your final output, but during editing you lot tin can manipulate each track independently. If you have an interview recorded with two microphones, each 1 can get in a divide track. If y'all have groundwork music, that could go in a third rail. You tin move the whole track along the Timeline then that information technology plays at a different point in time in the mix, but until information technology is split y'all cannot move individual parts of it around.
- A clip within an audio track is a split up section of that runway which has been divide then that it tin exist manipulated somewhat independently of the other clips in the track. For case, yous tin split an interview into separate clips for each sentence then movement them around individually although they are all from the same track. Or you could motion a clip to another track that is panned further correct, or split it to a new, empty track. The new rails simply contains that single clip, and so over again you can only motion that whole track unless yous split it into multiple clips.
Trimming a prune

You can trim a prune past dragging near the upper corner of its left and right edges. Doing then will hide the waveform that goes beyond it (every bit opposed to fully deleting it), and then if yous make some edits to the clip and so afterward decide to un-trim it, you can simply grab the upper corner once more and extend it.
All effects you use to the prune only use to the visible portion of the clip
Splitting a runway into Clips
When you lot record some sound or import sound from a file, you lot get a unmarried track. In many cases, there are natural gaps in the audio - silence betwixt sentences or pauses between phrases in music. Those are good candidates for splitting the rails into multiple clips, allowing you to move or otherwise manipulate those clips independently. There are several ways to create multiple clips in a track.
- > Split clip to split the prune at the current cursor position or selection region.
- at a region in an existing runway or clip, removing the selected audio without shifting the following audio.
- at a region in an existing track or clip, removing the selected audio to the Audacity clipboard without shifting the following audio.
- at a region in an existing runway or clip, moving the selected audio to the aforementioned position in a new runway at the bottom of the projection.
- at a region in an existing rails or prune, creating clips either side of accented silences.
- from the Audacity clipboard into vacant space in an existing track.
- Generate some sound into vacant space in an existing runway.
- Elevate a clip from a dissimilar track (or the whole rails) into vacant space in an existing rails.
Equally an example, the "before Dissever " and "after Split" images beneath show that subsequently selecting , the two boundaries of the gray pick region are overlaid with a solid black carve up line, marking the boundaries of the iii resulting clips.


It's like shooting fish in a barrel to select all the audio of a given clip. Make certain that Choice Tool ![]() is enabled in Tools Toolbar and so double-click in the prune. Yous tin can as well select all of an entire track that has no individual clips in this manner.
is enabled in Tools Toolbar and so double-click in the prune. Yous tin can as well select all of an entire track that has no individual clips in this manner.
Merging or joining Clips
Unlike cursor points or selection regions, split lines representing boundaries between clips persist in the waveform of the track until the clips are merged or joined back into one clip.
An adjacent pair of clips may exist "merged" into one clip by clicking on the split line to remove information technology. You tin perform a like "join" activity without a mouse past selecting beyond one or more than carve up lines then using to remove the split lines so every bit to make 1 clip.
If you hover over the Clip line and and then press and release the Esc primal you lot can then click on the Clip line and select from there by dragging, without deleting the clip line and merging the clips.
A number of menu items and corresponding keyboard shortcuts tin be used to select and navigate between clips.
Moving Clips
To move a clip, simply drag and drop it using the clip handle (the light area with the rounded corners) at the top of the clip.
To movement multiple clips at once, select all of the clips you desire to movement using the Selection Tool![]() , then drag a clip handle within the selected region to movement all selected clips. This will likewise motility the option area with it.
, then drag a clip handle within the selected region to movement all selected clips. This will likewise motility the option area with it.
If you click a elevate handle outside of the selected surface area, the selected surface area will stay where information technology is and y'all'll only motion i clip.
Notation that moving clips can brand use of the yellow Purlieus Snap Guides (also seen in the affiliate on Audacity Selection). When you motility a clip, Brazenness will snap the left or right boundary of a clip to the nearest edge of a clip in any other rails mark it with a yellow vertical line, making it very easy to line up clips during editing.
Moving stereo Clips
In nigh cases time-shifting a prune in a stereo track will piece of work exactly the same way every bit in a mono track. Most stereo tracks will have continuous sound in both channels and time-shifting a clip will move both channels equally.
In cases where they aren't, the following rules utilize:
- If yous grab a clip handle of a clip at a position where it stands lonely (significant there is no other clip in the stereo track), you volition just move the prune you're grabbing.
- If yous take hold of a prune handle at a position where the other aqueduct too has a clip, you will motility both channels.
- If you always desire to drag overlapped left-and right-channel clips simultaneously wherever y'all click in the clip, you can enable
- If you desire to movement clips in a stereo track independently from each other, you demand to divide the stereo rails into mono tracks first.
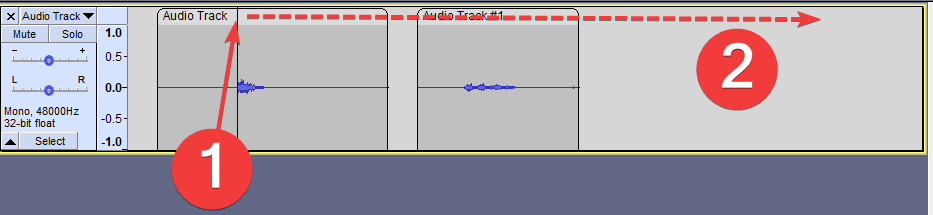
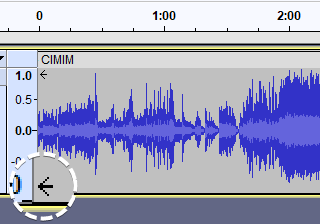
Moving to negative time
If an audio rails is dragged to the left (earlier on the Timeline) audio information may be hidden earlier the commencement of the track. This is indicated by the presence of two arrows at the left edge of the rails.
Audio before time cypher is non exported unless that audio is explicitly selected and used, or unless Consign Multiple is used with "Carve up files based on Tracks". In this Export Multiple by tracks example, the entire audio of each rails is exported, including that behind zero, regardless of whatever selection.
Moving a Clip Between Tracks
You lot can move a clip to a different rail, but there must be room for the clip between the clips on the second rails.

Waveform colorways
You tin optionally alter the colorway of the waveforms displayed in your project. The setting is per track and not per project and then yous can have multiple colorways in the same project every bit in the prototype below.
Four colorways are available with the colour option made from the dropdown carte in the rail's Track Command Console.

Moving colored Clips
A Prune takes on the selected color of the waveform that it originates in.
When a clip is moved into a different colored track, the prune retains its original colour.
-
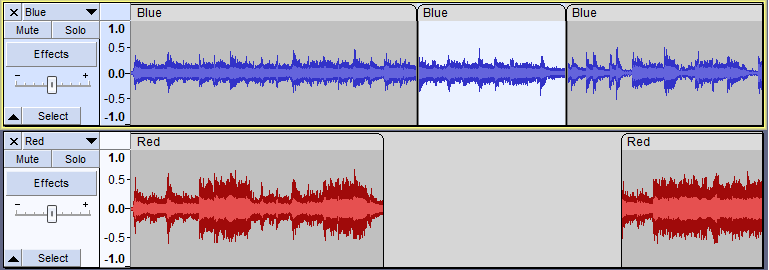
- Bluish clip in the top track with sufficient space in the lesser, cerise runway
-
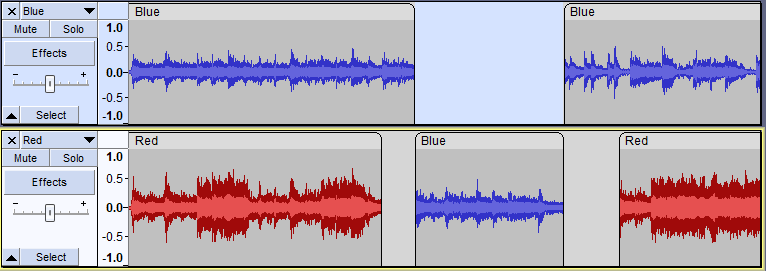
- The blue prune has been moved into the red track and retains its blue color
| | Changing the color in the Rails Dropdown Menu volition change the colors of all clips in that track, regardless of their current colors. This does make it a flake awkward if for example, yous have a track:
|

How To Add A Track To Audacity,
Source: https://manual.audacityteam.org/man/audacity_tracks_and_clips.html
Posted by: kellsknours00.blogspot.com
0 Response to "How To Add A Track To Audacity"
Post a Comment